Configuring Frigate NVR: An Open Source IP Camera Recording with Object Detection Solution

In this post, I’m documenting how I configured Frigate NVR as my open source NVR solution for my home IP cameras. I will explain what Frigate NVR is, why I use it, and step by step to configure Frigate NVR as a Docker container running on top an Orange Pi 5 Plus host machine.
What is Frigate NVR?
Frigate NVR is an open source system for network video recorder. From its website, the definition extends to its capability on using artificial intelligence to detect objects as its unique value proposition. That definition is true, because from my experience of using it for almost one month now, its object detection is really a feature that we can use to help detecting a person, a car, or any other object that we can define in its knowledge base. Apart from its unique value proposition, the basic feature as a video recorder is also good. Even, the first time I use Frigate NVR, I solely activate only its recording feature. Only after carefully tried its object detection feature to make sure that my hardware is capable to run it, I gradually added the object detection feature to some of my IP cameras.
Why I Use Frigate NVR
There are some choices when it comes to recording videos from an IP camera. We can insert an SD card to its internal slot if available and program it to record continuously or based on schedule. We also can buy a proprietary NVR that is suited to our IP camera’s brand. For example, I’m using Hikvision IP cameras, so that I can buy a Hikvision NVR that is surely designed to work well with all Hikvision cameras. The other option is to use an open source NVR if we know how to configure and use it by ourselves. As an IT guy who knows a little bit about technical details of the IP camera system, I choose the last option because first it’s more challenging. Second, it could offer a wide variety of features that are not provided by a proprietary NVR product. Third, we can match the features that we want to use with the capability of hardware we already have. For example I have an SBC powered by a quad core ARM processor. With its eight threads in total, it surely can do a lot more interesting things other than just recording, such as identifying objects. And last, we can replace the software part of our NVR with other solution in the future that might offers more interesting features.
Why not other open source solution such as Shinobi NVR? I previously used shinobi NVR for more than one month. It’s a great solution for recording and detecting motion. However, now it doesn’t have object detection as its core feature. The website said that we can use a plugin for that purpose, but I haven’t tried it yet. Then I tried Frigate NVR, knowing its name from some Youtube videos focusing on smart home system. After comparing the features between those two, I decided to use Frigate NVR for now.
My IP Cameras and Hardware
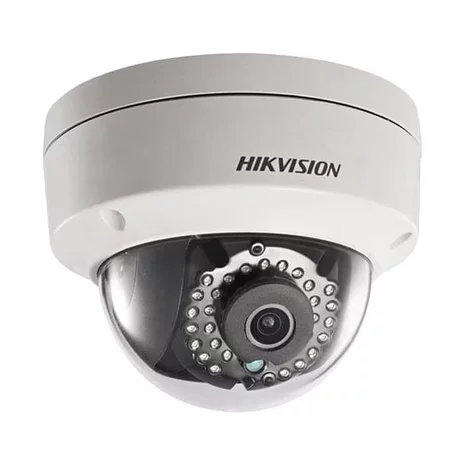
At the time of writing this post, I’m currently using seven Hikvision IP cameras. I bought six of them six years ago, they are from the model DS-2CD2120F-IW.
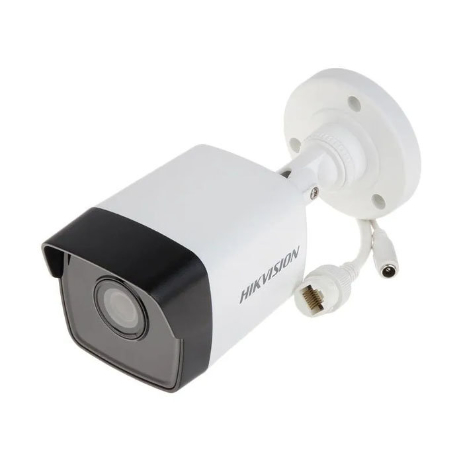
The other one is recently bought, it is from the model DS-2CD1021-I.
You can use any other brand of your choice of course. This post is not endorsed or sponsored by Hikvision. I’m using Hikvision because I already have them. As long as it is an IP camera that can provide streaming capability, it can be used by Frigate NVR. Camera specific configuration can be read from a Frigate NVR documentation page. For my case, Hikvision provides the following RTSP URL pattern for streaming:
# main stream
rtsp://[username]:[password]@[IP address]:554/Streaming/channels/101

# sub stream
rtsp://[username]:[password]@[IP address]:554/Streaming/channels/102
We can test the URL using VLC media player by opening Media menu, Open Network Stream submenu. Put the RTSP URL of the IP camera, and if the username and password are correct, you should be able to view the main stream or sub stream you your IP camera.
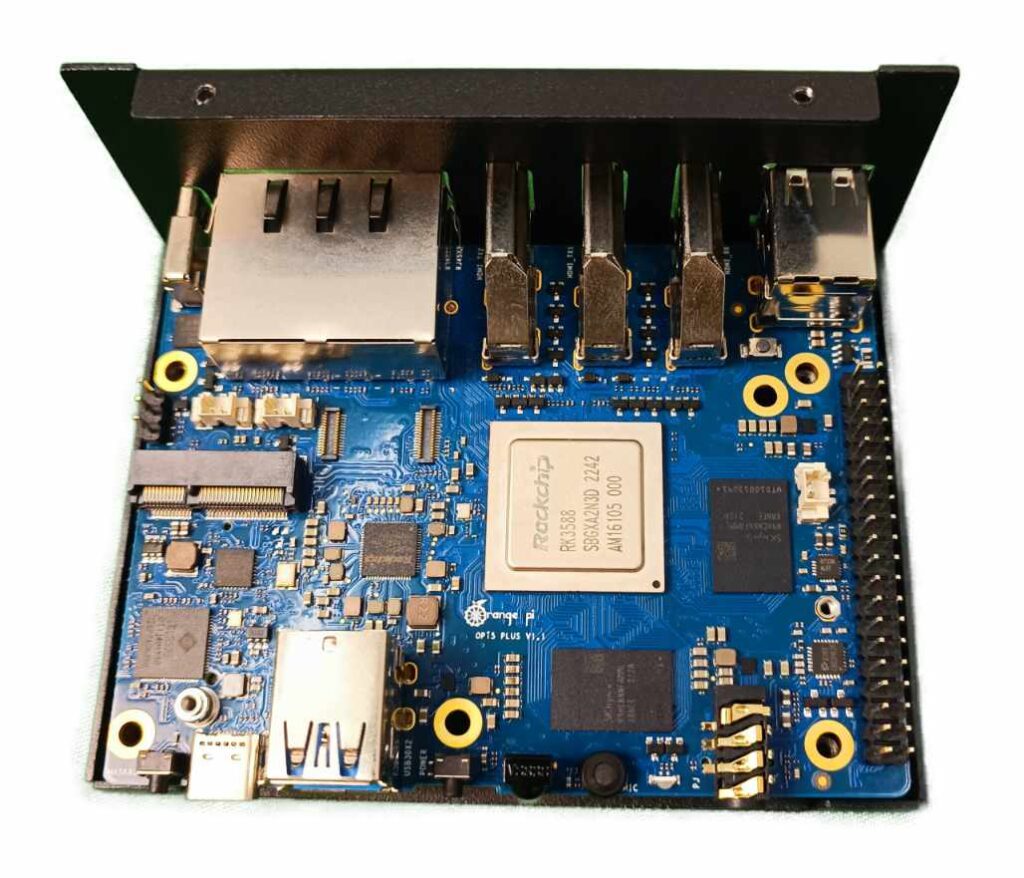
For my NVR hardware, I use an Orange Pi 5 Plus. It is a decent SBC with an octa core ARM64 CPU. My model has 16 GB RAM, which is plenty for this purpose. The 4 GB RAM model should be fine. I put a 256 GB M.2 NVMe SSD for the Ubuntu Server operating system, so it runs much faster than using an SD card.
Frigate NVR highly recommends to use additional hardware to free up the CPU from object detection tasks using its artificial intelligence capability. The suggested hardware is Google Coral. I would like to try it. However, at the time of writing this post, this device is not yet restocked after the world wide chip shortage event that happened recently. Even if you can find it on AliExpress, its price is far higher than the suggested MSRP. So, I’d better wait.
How-to Configure Frigate NVR
The Frigate NVR will be installed as a Docker container running on Ubuntu Server 22.04. I already wrote a post to prepare an Orange Pi 5 for a Home Server where I setup Docker engine on top of it. Although the post is intended for an Orange Pi 5, but the step by step can be applied to an Orange Pi 5 Plus too. The difference should only be on the operating system image, because there are separate operating systems for Orange Pi 5 Plus.
Then, we can write a Docker Compose yaml file for the Frigate NVR.
version: "3.9"

services:
  frigate:
    container_name: frigate
    image: ghcr.io/blakeblackshear/frigate:stable
    shm_size: "128mb" # update for your cameras based on calculation above
    #devices:
      #- /dev/bus/usb:/dev/bus/usb # passes the USB Coral, needs to be modified for other versions
      #- /dev/apex_0:/dev/apex_0 # passes a PCIe Coral, follow driver instructions here https://coral.ai/docs/m2/get-started/#2a-on-linux
      #- /dev/dri/renderD128 # for intel hwaccel, needs to be updated for your hardware
    volumes:
      - /etc/localtime:/etc/localtime:ro
      - /opt/frigate/config/config.yml:/config/config.yml
      - /mnt/nvr/frigate:/media/frigate
      - type: tmpfs # Optional: 1GB of memory, reduces SSD/SD Card wear
        target: /tmp/cache
        tmpfs:
          size: 1000000000
    #ports:
    #  - "5000:5000"
    #  - "8554:8554" # RTSP feeds
    #  - "8555:8555/tcp" # WebRTC over tcp
    #  - "8555:8555/udp" # WebRTC over udp
    environment:
      FRIGATE_RTSP_PASSWORD: "[your password]"
      TZ: Asia/Jakarta
    network_mode: host
    restart: unless-stopped
The first thing we should change is the shm_size on line 7. You can follow this guide to determine the proper shm_size. I commented out the devices section because I don’t use either Google Coral or Intel-based hardware acceleration devices. On line 14, there is a mapping for the configuration file. I put it in the /opt/frigate/config/ directory. Note that you have to create the configuration file first and then map it as a volume in the Docker Compose file. Line 15 is the path to media storage where Frigate NVR stores all recording videos and image snapshots.
Video recording needs a large storage. The M.2 NVMe SSD attached to the Orange Pi 5 Plus is only 256 GB and surely is not enough to retain video footage of seven IP cameras for a reasonable duration. So, I attached a 3.5″ external hard disk to one of its USB 3.0 ports. To make sure it is mounted every time the operating system restart, we have to map its configuration in the /etc/fstab file.
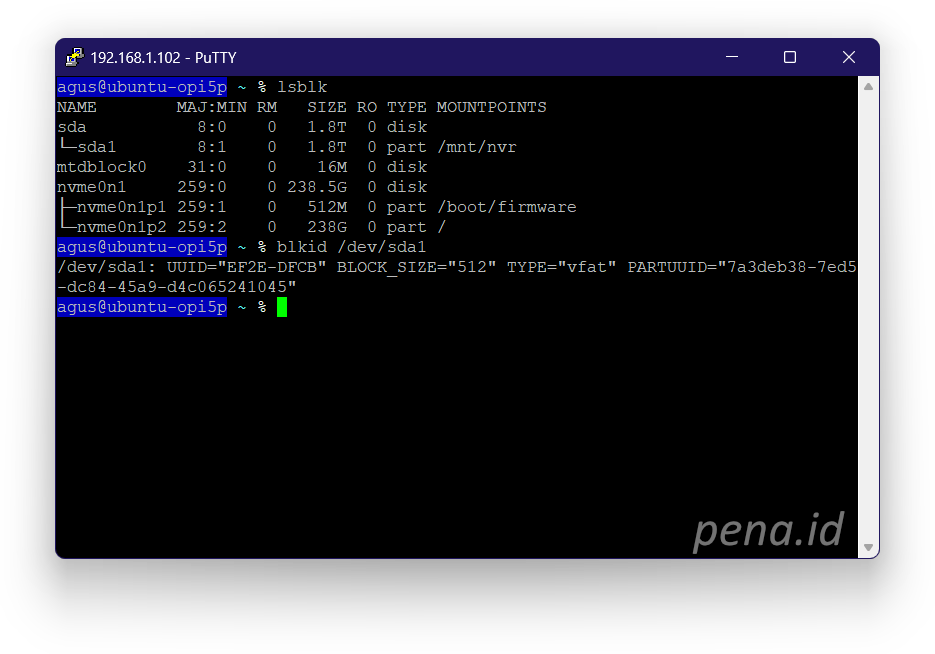
First we need to know path of the external disk using lsblk command. A single external disk is usually listed as /dev/sda1. If there are more than one partition, there should be /dev/sda2 and so on. If we have another external disk we should see it as /dev/sdb1, etc.
lsblkThen, we inquiry the UUID of the disk using blkid command.
blkid /dev/sda1As you can see from the image above, the UUID of the external disk is EF2E-DFCB, and its type is vfat. Then, we include this information into the /etc/fstab disk mount configuration.
# <file system>     <mount point>  <type>  <options>   <dump>  <fsck>
UUID=F6D8-D21C /boot/firmware vfat    defaults    0       2
UUID=f838b772-e129-4ee6-98be-274454091a0f /              ext4    defaults    0       1
/swapfile           none           swap    sw          0       0

UUID=EF2E-DFCB /mnt/nvr vfat defaults 0 0
The config.yml File
All configuration settings for Frigate NVR are stored in the config.yml file. If we are new to Frigate NVR, we could feel overwhelmed with the sheer amount of configuration settings in the documentation page. But don’t be discouraged, over time they will be familiar. As an example, here is my config.yml file content. The configuration file below is quite long and it needs explanation section by section.
# yaml-language-server: $schema=http://frigate_host:5000/api/config/schema.json
mqtt:
  enabled: True
  host: 192.168.1.101
  port: 1883
database:
  path: /media/frigate/frigate.db
detect:
  enabled: True
  fps: 5
record:
  enabled: True
  retain:
    days: 10
    mode: all
snapshots:
  enabled: True
birdseye:
  enabled: True
  mode: continuous
  restream: False
objects:
  filters:
    person:
      threshold: 0.8
cameras:
  cam71:
    ffmpeg:
      inputs:
        - path: rtsp://[username]:[password]@192.168.1.71:554/Streaming/channels/101
          roles:
            - record
  cam72:
    ffmpeg:
      inputs:
        - path: rtsp://[username]:[password]@192.168.1.72:554/Streaming/channels/101
          roles:
            - record
            - detect
  cam73:
    ffmpeg:
      inputs:
        - path: rtsp://[username]:[password]@192.168.1.73:554/Streaming/channels/101
          roles:
            - record
            - detect
  cam74:
    ffmpeg:
      inputs:
        - path: rtsp://[username]:[password]@192.168.1.74:554/Streaming/channels/101
          roles:
            - record
    objects:
      filters:
        person:
          mask: 0,0,1280,0,1280,720,0,720
  cam75:
    ffmpeg:
      inputs:
        - path: rtsp://[username]:[password]@192.168.1.75:554/Streaming/channels/101
          roles:
            - record
            - detect
    objects:
      track:
        - person
      filters:
        person:
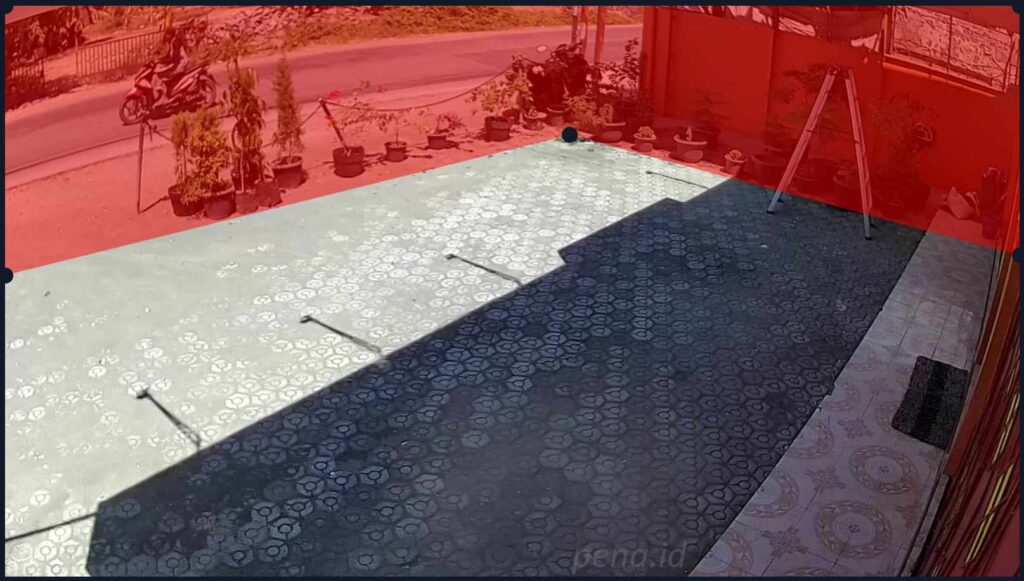
          mask: 936,567,531,720,1280,720,1280,281,1280,0,388,0,460,73,582,111,880,200,1140,310
  cam76:
    ffmpeg:
      inputs:
        - path: rtsp://[username]:[password]@192.168.1.76:554/Streaming/channels/101
          roles:
            - record
            - detect
    objects:
      filters:
        person:
          mask: 1280,0,1280,315,712,163,0,340,0,0
  cam77:
    ffmpeg:
      inputs:
        - path: rtsp://[username]:[password]@192.168.1.77:554/Streaming/channels/101
          roles:
            - record
            - detect
The first section, line 2 to 5 is for the integration to mqtt. If we wish to integrate Frigate NVR with Home-Assistant via mqtt, we must enable this setting. The host and port are the hostname or IP address of the mqtt server, and the port used by mqtt respectively.
mqtt:
  enabled: True
  host: 192.168.1.101
  port: 1883
Next section is database path. We could use the path where Frigate NVR stores all media files. Note that this path is relative to the Docker container file system, not the host file system.
database:
  path: /media/frigate/frigate.db
Then on line 8 to 10 we can configure the detection settings. By default it is enabled. So, if we wish to disable the object detection feature globally, we have to set it to false. The fps setting specify the frame per second of the streaming video for detection. Default value is 5. The following settings use default values, so the effect is the same as if we don’t specify it. But, for clarity purpose, I explicitly put them instead.
detect:
  enabled: True
  fps: 5
Line 11 to 15 is for global recording settings. By default it is disabled. We have to enable it if we want at least one of our IP cameras to record the streaming output. We can override the setting in each individual camera later if we want a particular camera not to record. The retain section contain the value of how many days we want to retain the recording. But it also depends on the capacity of storage media we use. The recording mode can also be specified to one of the following values: all, motion, and active_objects.
record:
  enabled: True
  retain:
    days: 10
    mode: all
Frigate NVR can take snapshots of object during detection. If we enable thus feature, each detected object will be captured, and then saved as still image to the media directory.
snapshots:
  enabled: True
Birdseye is a Frigate NVR feature to view all camera footage in real time. This is useful if we want to monitor real time situation of all cameras.
birdseye:
  enabled: True
  mode: continuous
  restream: False
The objects filter can be used to specify a threshold for detected object to be included in the detection results. I use 80% threshold for person detection, since from my experience, a threshold below 80% sometimes detect a false positive object. For example, a picture or painting of person can be detected as person.
objects:
  filters:
    person:
      threshold: 0.8
Each IP camera has its own settings. Now I have seven IP camera included in the settings. I will pick Cam75 as an example here.
  cam75:
    ffmpeg:
      inputs:
        - path: rtsp://[username]:[password]@192.168.1.75:554/Streaming/channels/101
          roles:
            - record
            - detect
    objects:
      track:
        - person
      filters:
        person:
          mask: 936,567,531,720,1280,720,1280,281,1280,0,388,0,460,73,582,111,880,200,1140,310
The ffmpeg section should be clear enough. It specifies the RTSP URL of the IP camera. The roles can be specified as record for recording, detect for object detection, and the other one is rtmp, which is now deprecated in favor of restream. We can also specify object mask, where we can exclude certain area for object detection. We can use the web UI to specify the mask.
The following image shows the corresponding mask area defined above in red. It means that Frigate NVR won’t detect person object in the area inside the mask.
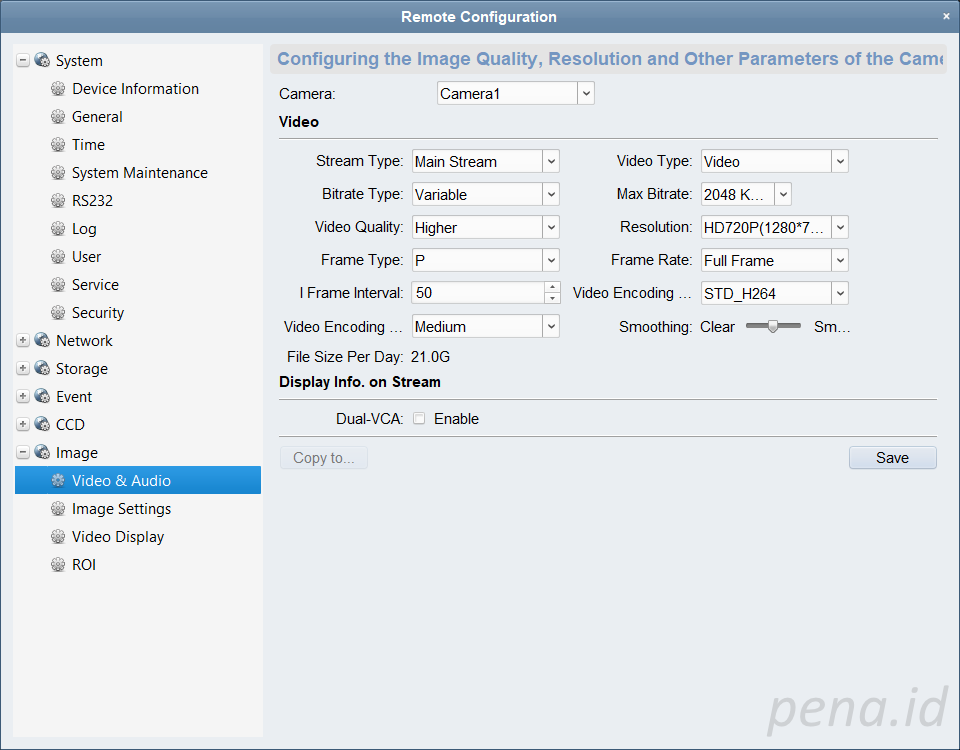
I use the following setting for the output of each camera. The image resolution setting is important here, since it determines the effort required of CPU (or Google Coral device if available) to detect object. The higher the resolution, the bigger the effort. So, I specify 720p as the main stream both for recording and object detection.
Resource Usage
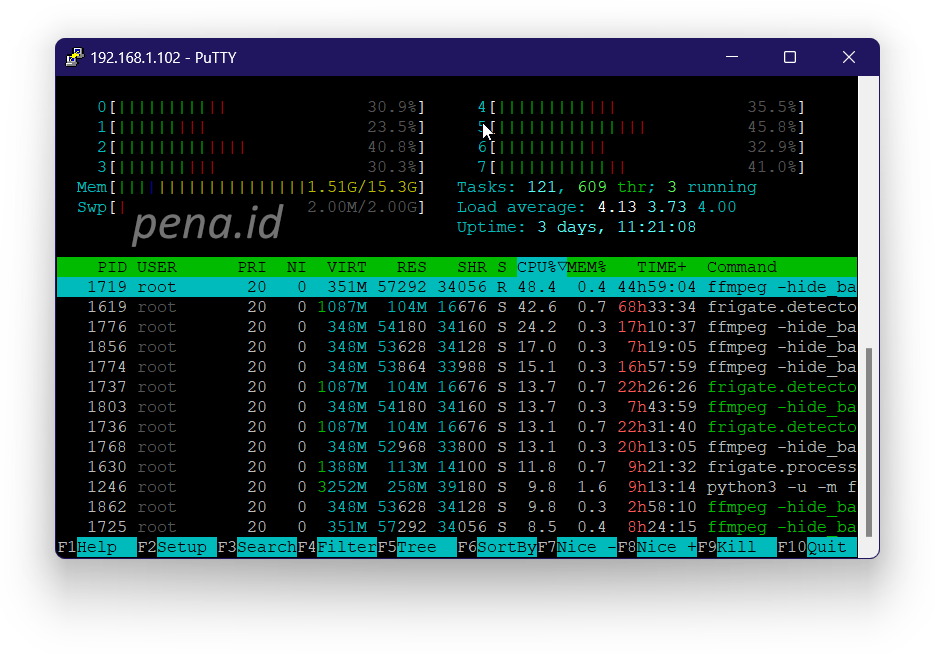
Using seven Hikvision IP cameras and no other Docker container running on the host machine, except Portainer, the following image captures typical resource usage in terms of CPU and memory utilization. You can see the load average is around 4. However, it fluctuates based on on the actual load. Sometimes it can spike up to 7.
Conclusion
In this post, I have explained what Frigate NVR is, why I use it, and the step by step on installing and configuring Frigate NVR as a Docker Container. In my specific setup, I use seven Hikvision IP cameras, and an Orange Pi 5 Plus 16 GB RAM as the hardware running the Docker Container. Without Google Coral as a hardware acceleration device, we can see that resource utilization and load are still normal, and the performance is acceptable.

