Installing and Configuring Home Assistant Stack on Docker Ubuntu Server 22.04

In this post, I’m documenting how I installed and configured Home Assistant stack on Docker running on Ubuntu Server 22.04.02 LTS. Along with Home Assistant, I installed and configured mosquitto (mqtt) broker, zigbee2mqtt, hass configurator, and nodered. The objective is to establish a fundamental infrastructure, system, and applications supporting a smart home environment that I am now currently building.
The host operating system is Ubuntu Server 22.04.02 LTS Jammy Jellyfish running on Orange Pi 5. Actually I’ve tried the same stack running on Ubuntu Desktop both for AMD64 and ARM64 architectures. Since we are using Docker, the processes and activities are actually the same in any environment and architecture. But, I specifically targeted this Home Assistant stack to run on Orange Pi 5 because currently it is a decent SBC with quite reasonable price and most importantly it is available (not short on stock).
The Docker containers that we will create in this post are written as Docker Compose files. Although we can create a Docker Container directly from the command line, but there are some advantages of using Docker Compose method. The most obvious advantage is that it is written declaratively in a YAML file. We can save the YAML file as a source code that we can refer and revise later if needed. We also can create several Docker Containers using one single YAML file and stating dependencies among containers. It will make deployment easier and less complicated.
Although this is a Docker stack aiming to run all containers related to Home Assistant, we will create each container separately. By doing this we can create, bring up, test, and debug each container separately. There will be dependencies between one container to another, but it will not be stated explicitly in the Docker Compose file. It depends on our knowledge about the dependencies among containers that should be documented elsewhere.
Because we use Ubuntu Server, there is no graphical user interface that we can use to easily edit the source YAML files of all Docker containers. But, we won’t use a text editor directly from the server’s console. We’ll use a client computer that connects to the server via SSH. In the client computer, we install Visual Studio Code, and using Remote Explorer extension to directly interact with the source codes in the server. Visual Studio Code is very handy for this purpose, since it also has Docker extension where we can use to perform Docker commands such as docker compose up by right clicking on the YAML files.
For this Home Assistant demo purpose, I use three Zigbee devices connected to a Zigbee Coordinator. There’s an Aqara motion sensor, a Tuya door / window sensor, and an Almo bell. We will create a very simple automation to prove the Home Assistant and its connected devices and automation created among those devices are working.
The Docker Workspace
I’m calling the Docker workspace as the locations or directories where Docker’s stuffs are organized in the server. I group it into two categories: the directory for Docker Compose files for all containers, and the directory for all mapped Docker volumes. For the first group, I’d like to keep it on the home directory of the user I use for connecting to the server. For the second group, I’d like to store it inside the /opt directory of the server. We can open the home directory from VS Code, so that we can edit all Docker Compose files from a single application. But sometimes we have to edit the configuration files that are mapped from Docker containers. These configuration files are located in the /opt directory, a different directory with different access permissions. In order to be able to edit the configuration files using the same single application (VS Code), we will create symbolic links from directories within the first group to the directories within the second group, respective to the mapped configuration of each Docker Container. Then we configure the owner and access permission of the files so that we, as regular user (not root) can edit the files within VS Code.
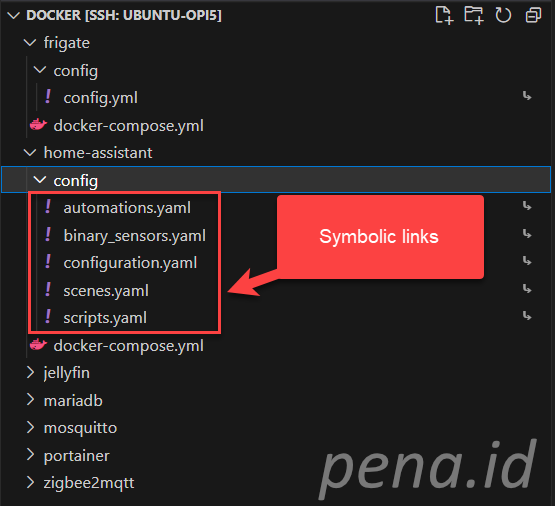
To make it clear, here is the picture of the first group directory, focusing on the content of home-assistant Docker Container workspace. The VS Code opens the /home/agus directory on the server. So, actual path for file automations.yaml is /home/agus/docker/home-assistant/config/automations.yaml.
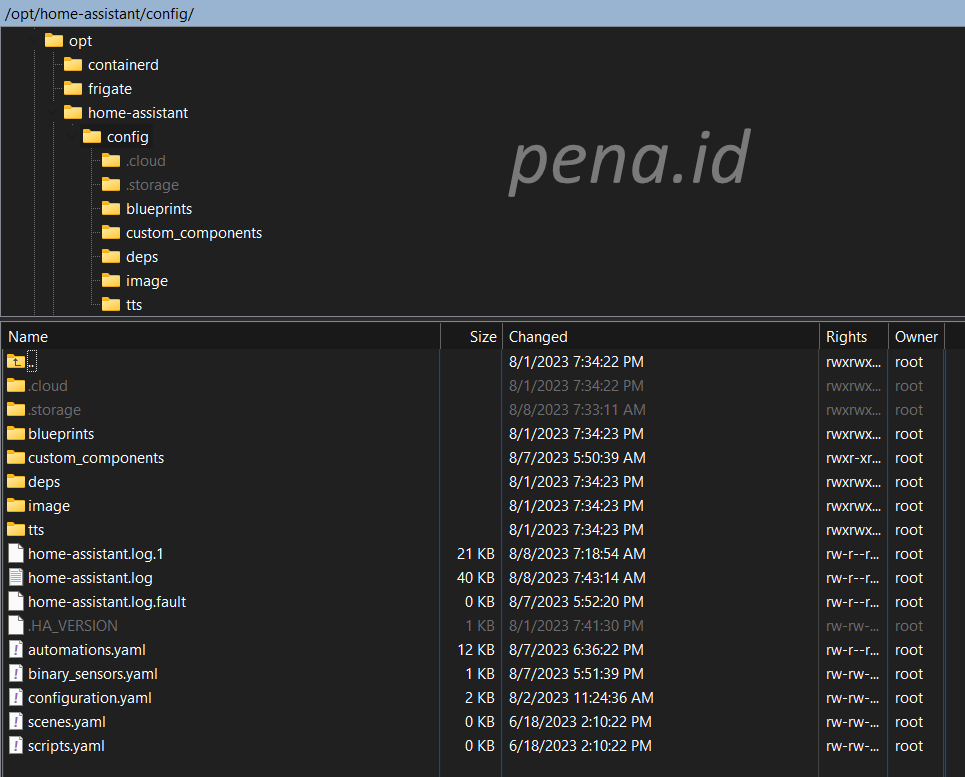
Here is the content of the /opt directory, focusing on the home-assistant sub directory. As you can see, all the yaml files listed on the VS Code above are actually points to the files within this sub directory.
To create a symbolic link, for example for file automations.yaml, cd into /home/agus/docker/home-assistant/config, and then execute the following command.
ln -s /opt/home-assistant/config/automations.yaml automations.yamlThen, configure the owner and access permissions for the file inside the /opt directory. The owner should be root because it is created inside the /opt directory which by default can only be write-accessed by root. In order to be able to edit it using regular user name, we must make sure that the username is a member of docker group. Then we can set the group ownership of the files to docker group. Lastly, we set the file permission to 664 so it dan be written by all members of the docker group. The following commands do all of those.
sudo chown root:docker automations.yaml
sudo chmod 664 automations.yaml
Mariadb Docker Compose
Mariadb is used mainly by Home Assistant. However, because it’s an open source database server, it can be used by any Docker containers in the future. The Docker Compose file for this container is pretty straightforward. We only need to specify the root password, an initial database name, the username used to connect to the database, and its password. Note that the ports section is commented because I use host network mode. It will automatically use port 3306 of the host.
version: '3'

services:
  db:
    container_name: mariadb
    image: mariadb
    environment:
      MYSQL_ROOT_PASSWORD: "password"
      MYSQL_DATABASE: devdb
      MYSQL_USER: maria
      MYSQL_PASSWORD: "password"
    volumes:
      - /opt/mariadb/data:/var/lib/mysql
      - /opt/mariadb/docker-entrypoint-initdb.d:/docker-entrypoint-initdb.d
    #ports:
    #  - "3306:3306"
    network_mode: host
    restart: unless-stopped
Mosquitto (mqtt) Docker Compose
Mosquitto is used as one of integration components in Home Assistant. It’s a popular messaging platform for IoT platform running on top of TCP protocol. The Publish-Subscribe communication mechanism among all devices connected to Home Assistant will be conducted by this Docker Container.
The following code snippet is for Mosquitto Docker Container.
 version: '3'

  services:
    mosquitto:
      container_name: mosquitto
      image: eclipse-mosquitto
      #ports:
      #  - 1883:1883
      #  - 9001:9001
      volumes:
        - /opt/mosquitto/config:/mosquitto/config
        - /opt/mosquitto/data:/mosquitto/data
        - /opt/mosquitto/log:/mosquitto/log
      environment:
        - TZ=Asia/Jakarta
      network_mode: host
      restart: unless-stopped
Here is the content of my /opt/mosquitto/config/mossquitto.conf file. It still allows anonymous access which is not secure by default. To make it more secure, you should change allow_anonymous to false and then configure user and password.
persistence true
persistence_location /mosquitto/data/
log_dest file /mosquitto/log/mosquitto.log
listener 1883 0.0.0.0
allow_anonymous true
If you want to test whether the mqtt works, you can use the following python code.
import paho.mqtt.client as mqtt
import time

broker_hostname = "192.168.1.111"
port = 1883

def on_connect(client, userdata, flags, return_code):
    if return_code == 0:
        print("connected")
    else:
        print("could not connect, return code:", return_code)

client = mqtt.Client("Client1")
# client.username_pw_set(username="user_name", password="password") # uncomment if you use password auth
client.on_connect=on_connect

client.connect(broker_hostname, port)
client.loop_start()

topic = "Test"
msg_count = 0

try:
    while msg_count < 100:
        time.sleep(1)
        msg_count += 1
        result = client.publish(topic, msg_count)
        status = result[0]
        if status == 0:
            print("Message "+ str(msg_count) + " is published to topic " + topic)
        else:
            print("Failed to send message to topic " + topic)
finally:
    client.loop_stop()
Zigbee2mqtt Docker Compose
The following code snippet is for Zigbee2mqtt Docker Container.
version: '3'

services:
  zigbee2mqtt:
    image: koenkk/zigbee2mqtt
    container_name: zigbee2mqtt
    #ports:
    #  - 8081:8080
    volumes:
      - /opt/zigbee2mqtt/app-data:/app/data
      - /run/udev:/run/udev:ro
    devices:
      - /dev/serial/by-id/usb-1a86_USB_Serial-if00-port0:/dev/ttyUSB0
    privileged: true
    network_mode: host
    restart: unless-stopped
Zigbee2mqtt needs a Zigbee gateway to work with. I use a generic Zigbee gateway that I bought from a local marketplace site. After plugging in, check whether the operating system could detect it. In Ubuntu, check its presence in the /dev/serial/by-id directory. In my case, my device id is usb-1a86_USB_Serial-if00-port0. So, I map it to /dev/ttyUSB in the code snippet above. Note that if you use Ubuntu Desktop 22.04, you have to uninstall brltty because it conflicts with the device. Use the following command to remove it.
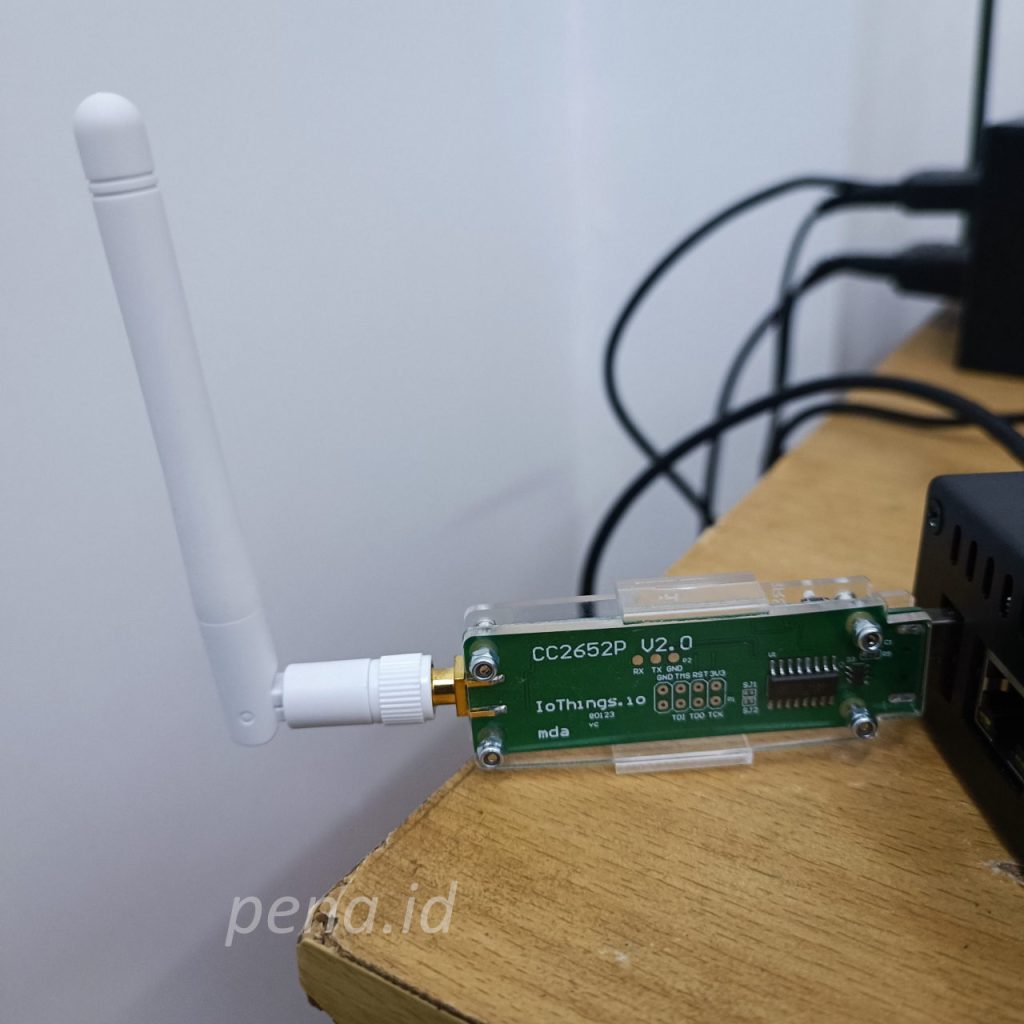
sudo apt purge --auto-remove brlttyThe following image is the Zigbee gateway I use. It is important to not directly plug the Zigbee gateway to the USB port of the PC because it will be affected by signal interference of the PC components. For a better result, provide a USB cable extension between the Zigbee gateway and the PC. So, the following way of plugging the device into the PC is not correct, don’t follow it.
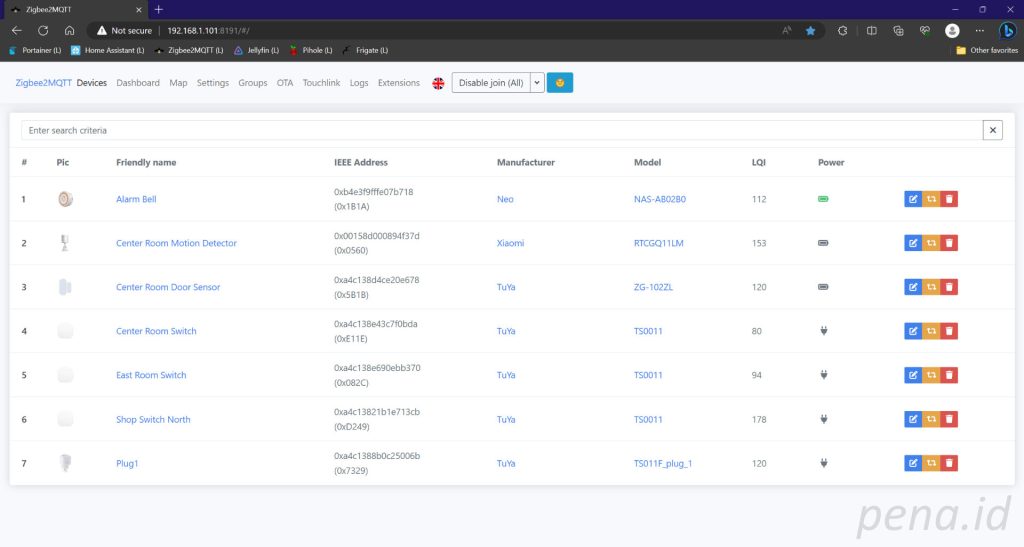
Here is the snippet of my /opt/zigbee2mqtt/app-data/configuration.yaml file. The frontend port specifies the port for the website where we can view all connected devices and change the settings if required.
homeassistant: true
permit_join: true
frontend:
  port: 8191
mqtt:
  base_topic: zigbee2mqtt
  server: mqtt://192.168.1.101
serial:
  port: /dev/ttyUSB0
devices:
  # will be updated by zigbee2mqtt automatically
Here is the look of my zigbee2mqtt frontend website.
Home-Assistant Docker Compose
The following code snippet is for Home-Assistant Docker Container.
version: '3'

services:
  home-assistant:
    container_name: home-assistant
    image: homeassistant/home-assistant
    #ports:
    #  - 8123:8123
    volumes:
      - /opt/home-assistant/config:/config
      - /etc/localtime:/etc/localtime:ro
    privileged: true
    network_mode: host
    restart: unless-stopped
In the /opt/home-assistant/config/configuration.yaml file, the most important thing we need to change is the recorder section, especially at line 10 below. We have to specify the mariadb database, user, password, and host of our local mariadb installation we already setup above.
recorder:
  db_url: mysql://[mariadb_user]:[mariadb_password]@[mariadb_host]/homeassistant?charset=utf8
  purge_keep_days: 30
Then, if we are exposing the frontend website to a reverse proxy such as nginx, we have to add the following section. Put the IP address of the reverse proxy server to the trusted_proxies field.
http:
  # For extra security set this to only accept connections on localhost if NGINX is on the same machine
  # Uncommenting this will mean that you can only reach Home Assistant using the proxy, not directly via IP from other clients.
  # server_host: 127.0.0.1
  use_x_forwarded_for: true
  # You must set the trusted proxy IP address so that Home Assistant will properly accept connections
  # Set this to your NGINX machine IP, or localhost if hosted on the same machine.
  trusted_proxies: 127.0.0.1
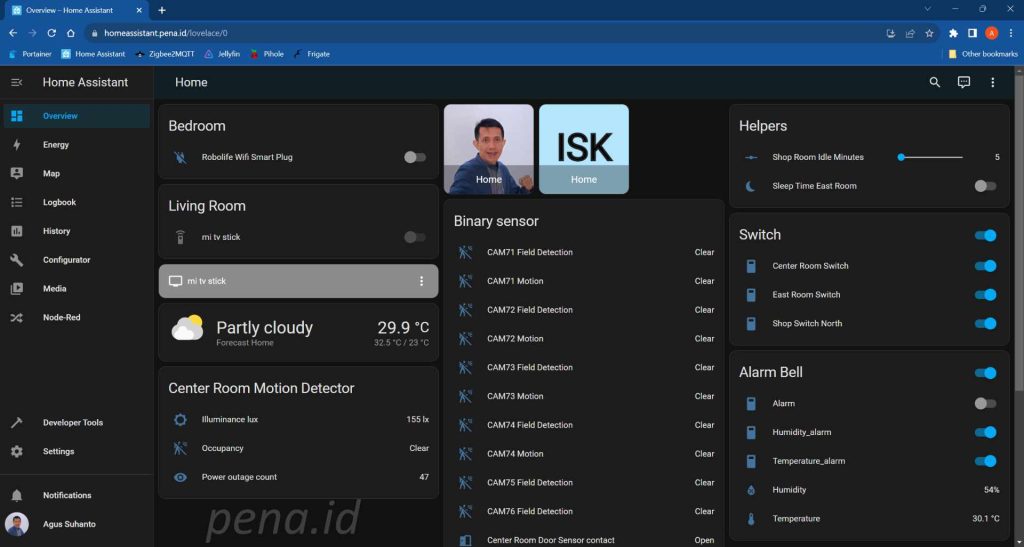
Here is my local Home Assistant frontend website after login.
Hass Configurator Docker Compose
Hass Configurator is mainly used to edit the Home Assistant configuration files from a web interface. This is not necessary if you prefer to edit the files from an advanced source code editor such as Visual Studio Code. However, if you use other computer that does not have Visual Studio Code installed, you can conveniently edit the configuration files directly from the web UI.
The following code snippet is for Hass Configurator Docker Container.
version: '3'

services:
  hass-configurator:
    container_name: hass-configurator
    image: "causticlab/hass-configurator-docker:arm"
    #ports:
    # - "3218:3218/tcp"
    volumes:
      - "/opt/hass-configurator/config:/config"
      - "/opt/home-assistant/config:/hass-config"
    network_mode: host
    restart: unless-stopped
Nodered Docker Compose
Nodered in this context is mainly used to design automation for Home Assistant. It is a visual activity flow that should be easier to understand than the Home Assistant visual editor.
The following code snippet is for Nodered Docker Container. This configuration for Nodered is still basic, and not yet include add-ons for Home Assistant. I will post another post in the future to explain more advanced configuration of Nodered with Home Assistant.
version: '3'

services:
  nodered:
    container_name: nodered
    image: nodered/node-red
    #ports:
    #  - "1880:1880"
    volumes:
      - /opt/nodered/data:/data
    environment:
      TZ: "Asia/Jakarta"
    network_mode: host
    restart: unless-stopped
Conclusion
In this post, I’ve explained how to build the Home Assistant Docker containers stack, starting from Mariadb, Mosquitto, Zigbee2mqtt, Home Assistant, Hass Configurator, and then finally Nodered. I’ve explained how the Docker workspace files are located in the host operating system and how to edit them. Basic configuration for each Docker Container is also listed.

