Orange Pi 5 Switching to Ubuntu

In this post, I’m documenting the switching process from Armbian Jammy to Ubuntu Jammy 22.04 for my Orange Pi 5. I have to switch because I have other Ubuntu desktop installation on my PC, and I am already accustomed to using Ubuntu. So to make a singular experience across my X86 and ARM64 machines, I switched my Orange Pi 5 OS to Ubuntu 22.04 (Jammy Jellyfish).
1. Installing Ubuntu Jammy Desktop to a Micro SD Card
The process of installation of the Ubuntu Jammy to a micro SD card is similar to my previous experience on installing Armbian to my a micro SD card when preparing my Orange Pi 5 for a Home Server. The only difference is the image. We can use the image referred by Orange Pi 5 official software download page, or in my case, I choose to use the Joshua Riek’s Ubuntu image for Rockchip. The reason I use Joshua’s version is because it has already been patched with panfork mesa supporting GPU Mali G610 to enable hardware accelerated graphics tasks. When this post is written, the latest Ubuntu version is 22.04.2 LTS (Jammy Jellyfish).
2. Installing Ubuntu Jammy Server to the NVMe Disk
After successfully booting from a micro SD card, next step is to flash the installed NVMe disk with Ubuntu Jammy Server image. The reason of using server image instead of desktop image is because this device will be used as a home server, so there is no need to install the desktop version. The step is also similar with my previous experience with Armbian Jammy. Download the the Joshua Riek’s Ubuntu Server Image, then flash it to the NVME Disk using Disk Image Writer.
Next is wiping out all content from the the SPI module.
sudo dd if=/dev/zero of=/dev/mtdblock0 bs=16MB count=1Then configure the SPI module to boot from the NVMe disk by typing this command (from the wiki page).
sudo dd if=/lib/u-boot-orangepi-rk3588/rkspi_loader.img of=/dev/mtdblock0 conv=notruncUnplug the micro SD card from its slot, then reboot. We should be booting from the NVMe disk.
3. Change the hostname
By default the hostname of the Orange Pi 5 Ubuntu Server is ubuntu. We should change this to something more unique. To change the hostname, use the following command. I choose ubuntu-opi5 as the hostname. You can come up with a better name than mine of course.
sudo hostnamectl set-hostname ubuntu-opi54. Change the IP Address to Static
The server should mostly be accessed remotely via SSH. So, having a static IP address is a requirement. The SSH server itself is already installed by default, but the IP address is configured dynamically via DHCP. We can use netplan to configure it. Open the netplan yaml file using a text editor. It should be located in the /etc/netplan directory. The name of the file is different from one installation to another. So, just look into that directory to find out the file name. In my installation, the filename is 50-cloud-init.yaml. I changed its content to the following text block. Note that you should choose the IP address of your liking, not necessarily the same with mine.
network:
    ethernets:
        eth0:
            dhcp4: false
            addresses:
                - 192.168.1.111/24
            routes:
                - to: default
                  via: 192.168.1.1
            nameservers:
                addresses:
                    - 192.168.1.1
    version: 2
Create a file inside /etc/cloud/cloud.cfg.d and name it 99-disable-network-config.cfg, and put the following content, then reboot.
network: {config: disabled}If we use a local DNS server, for example using Pihole, the following additional steps need to be done. Enter the following command to edit /etc/systemd/resolved.conf file.
sudo nano /etc/systemd/resolved.confUncomment the DNS entry and fill the value with the IP address of the local DNS server. Also uncomment the DNSStubListener and change the value to no.
[Resolve]
DNS=192.168.1.131
#FallbackDNS=
#Domains=
#LLMNR=no
#MulticastDNS=no
#DNSSEC=no
#DNSOverTLS=no
#Cache=no
DNSStubListener=no
#ReadEtcHosts=yes
Then, create the following symbolic link:
sudo ln -sf /run/systemd/resolve/resolv.conf /etc/resolv.confApply the network configuration and then reboot the server.
sudo netplan generate
sudo netplan apply
sudo reboot
Now, we should be able to SSH to the Orange Pi Server using a static IP address. Also, if we use nslookup command, the DNS server should point to our local DNS server.
5. Create a New User
By default, Ubuntu Server created initial user called ubuntu. We should create another user of our own, or if you prefer, rename the ubuntu user to your liking. I prefer to create another username, in my case: agus.
sudo adduser agusWe need to fill a bunch of user information. Then grant the user sudo privileges.
sudo usermod -aG sudo agusIf we don’t want to enter password each time we use sudo command, execute the following command:
sudo visudoThen add the following line at the end of opened text editor:
agus ALL=(ALL) NOPASSWD:ALL6. Switching from Bash to Zsh (Optional)
The default shell used by Ubuntu is Bash. I prefer using Zsh for my daily activities. But you don’t have to. You could stay on Bash if you prefer. To change Ubuntu default shell, login as the new user, then use the following commands.
First, install the Zsh shell.
sudo apt install zsh -yThen, make Zsh the default shell. Note: don’t use sudo to execute this command.
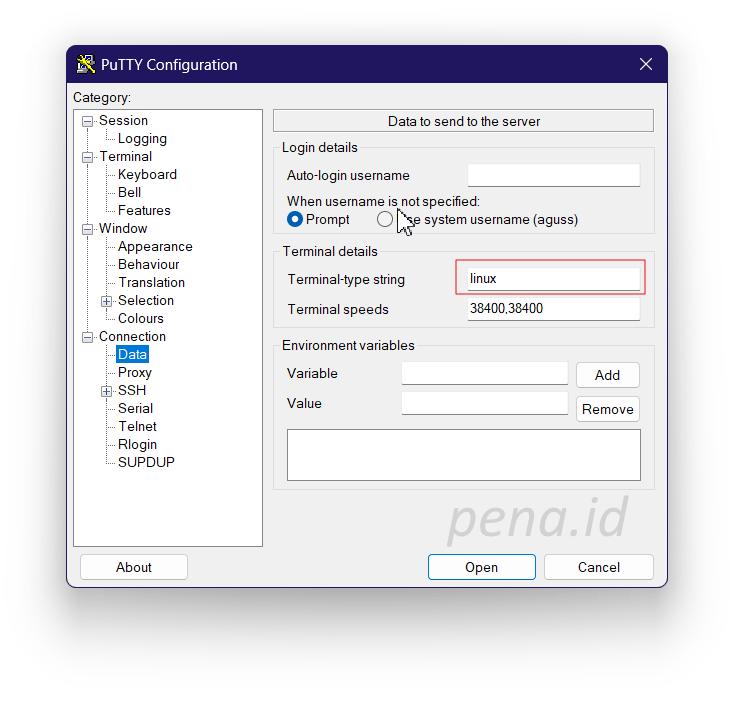
chsh -s /bin/zshAfter entering the password, close the SSH connection and then open a new SSH session. If we’re using PuTTY, don’t forget to change the Terminal-type string in the Data page from xterm to linux to fix numpad typing behavior.
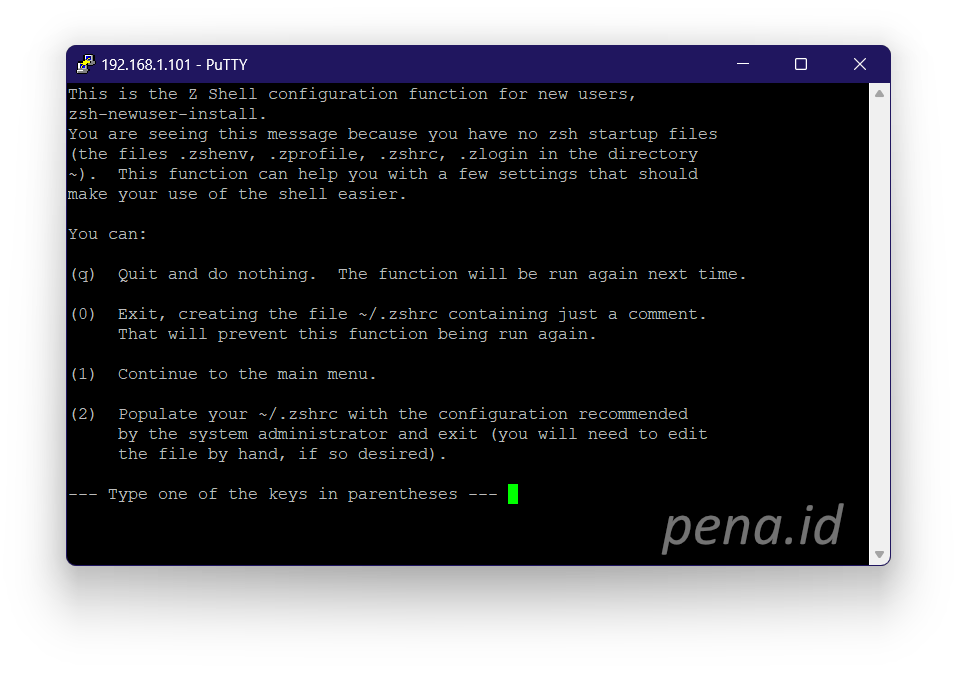
The first time we use SSH, a prompt like the following picture will be displayed. Choose numer (2) to create .zshrc file and populate it with the recommended configuration.
Change the prompt color by editing the .zrhrc file. For example if we want the prompt color to be magenta, add the color name (magenta) after theme name (adam1).
prompt adam1 magentaIf we want to have an alias for a command we frequently use, add it add the end of the .zshrc file. For example, if we frequently use abbreviated command ll as an alias for the command “ls -lah”, we can put the following line.
alias ll="ls -lah"7. Add Public Key Authentication to SSH
Currently, the SSH server is using default password authentication. This is fine and secure enough if your password is secure. But secure password is often complex and difficult to remember. So, I’d prefer to add public key authentication, so that I don’t have to remember and type password each time I connect to the server via SSH. The private key itself needs to be secured by password (or passphrase) if we want better security. But, for practical purpose, I prefer to use plain private key without password.
First we might want to generate our public/private key pair, if we don’t have any. Otherwise, we can use existing public/private key pair. To generate public/private pair from an Ubuntu terminal, use the following command:
ssh-keygenTwo files will be generated: the private key and the public key (both files will be generated at ~/.ssh/id_rsa and ~/.ssh/id_rsa.pub respectively if we don’t change the location of generated files). The public key will be saved in the server, and the private key will be used by client apps such as PuTTY to connect to the SSH server using corresponding public key. So, we might want to remove the private key from the server, and store it security in our client devices.
Type the following command to configure public key on the SSH Server (assuming that the public key was generated at ~/.ssh directory).
cat ~/.ssh/id_rsa.pub > ~/.ssh/authorized_keys
chmod 600 ~/.ssh/authorized_keys
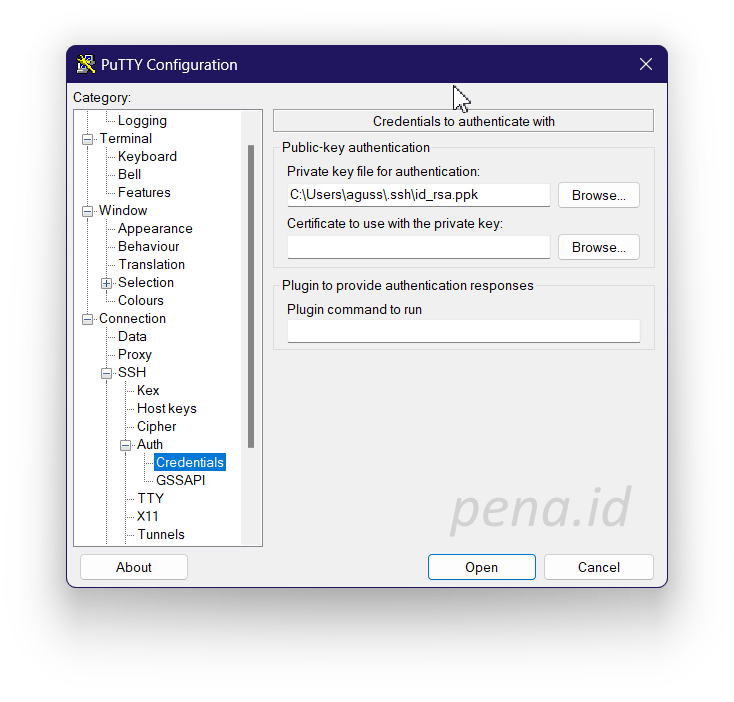
Now reboot the device. After turned on, create a SSH connection using the corresponding private key. The password authentication is still on, so if we don’t provide the private key, the usual password authentication method is used. Using PuTTY, we should tell where the private key is located in the Connection > SSH > Auth > Credentials menu. And remember, PuTTY uses ppk format instead of the format originally used after generating the private key (pem). We can use PuTTYgen to convert the private key from pem format to ppk format.
Conclusion
In this post, I’ve documented how I changed my mind from using Armbian to using Ubuntu for my Orange Pi 5 device. Starting from flashing the image and booting from a micro SD card until configuring SSH to use public key authentication. The docker engine installation follows the same step when I configured docker for Armbian. Next step is to configure Jellyfin media server.


