Preparing Orange Pi 5 for a Home Server

I’ve just got an Orange Pi 5 16 GB memory. It is intended to be used as a home server where Docker containers such as Home Assistant, Jellyfin media server, and Pihole ad blocker server will run. It is a Single Board Computer (SBC) that should consume less power than a desktop PC, but powerful enough to automate smart appliances in a small home.
In this post, I will prepare my Orange Pi 5 for a home server, starting from installing Armbian OS, installing and configuring Docker and Docker Compose, and running Portainer as an initial Docker container on top of it. Eventually I will install and configure Home Assistant Docker container and other related containers for home automation, but of course they will be for separate posts in the future.
Why I Chose Orange Pi 5
Previously I own a Raspberry Pi version 3B with only one GB of memory. It is a decent SBC that consume a little power. It runs well using 10 watt power adaptor. I already tried it as Jellyfin media server without transcoding. It is also useful as local DNS server and ad blocker using Pihole. But of course it is outdated. The newer version, Raspberry Pi 4B offers a lot more capabilities with newer hardware. But, unfortunately I don’t have it. I’d like to buy it but it is rare here in Indonesia as well as in other parts of the world. If available, the price is much higher that its MSRP.
Orange Pi offers hardware capabilities and varieties more than the Raspberry Pi 4B. Its price is also decent, and more importantly it is available. Sure, its software and communities are not yet as mature as Raspberry Pi, but well.. I’d be part of the community member that will spread the value of this SBC, so more people will know about its presence, and more people will adopt it. Over time, I believe the communities around Orange Pi will be bigger and bigger as well as its software support.
There are many versions of Orange Pi, and each version offers varieties of memory sizes. My choice is the Orange Pi 5 16 GB memory version. Well, I chose Orange Pi 5 because its hardware spec is high enough, comparable to Raspberry Pi 4B, and it supports NVMe M.2 SSD storage (PCIE Gen 2) that should be faster than a Micro SD. I chose a 16 GB memory size because I will use it as a host for Docker containers that will run many applications for my smart home. Although, Docker engine should run well on a 4 GB memory version, but well.. I prefer to provide more room for future growth.
Below is the picture of my Orange Pi 5 16 GB version.

If we look closer, this is the picture of Rockchip RK3588S powering this device.

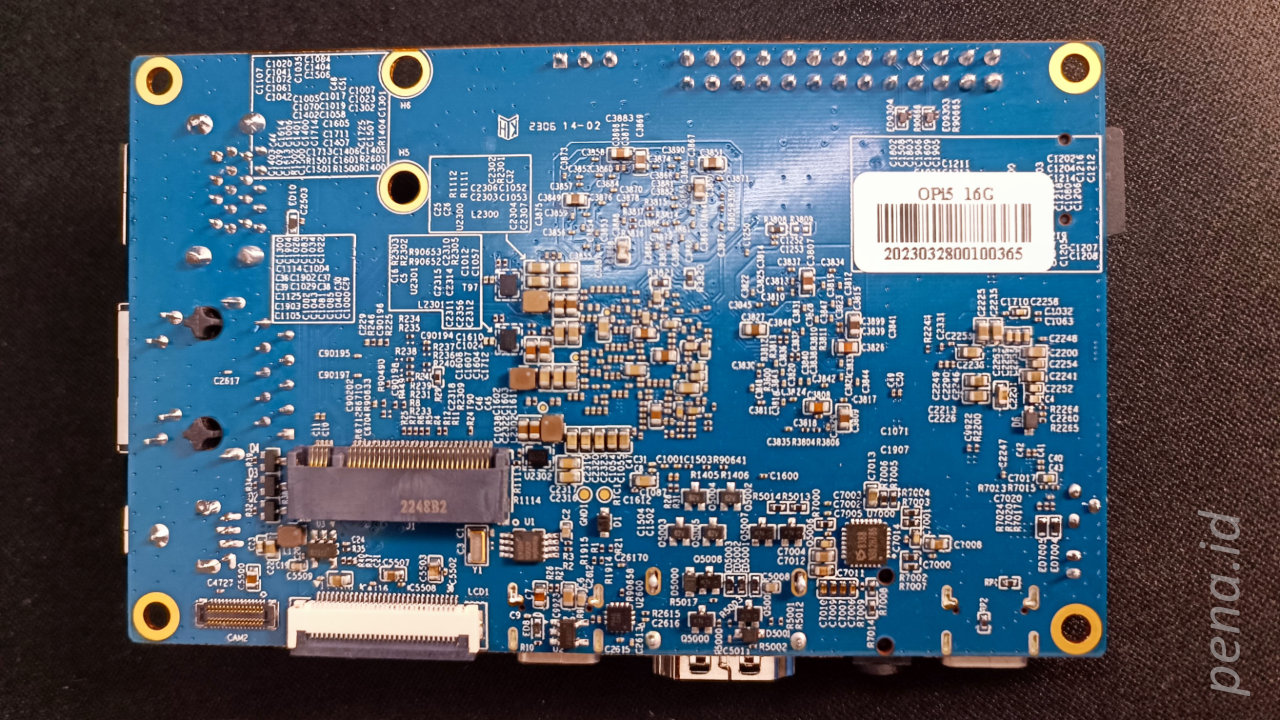
The following image shows the bottom side of Orange Pi 5 where we can see a slot for 2242 or 2230 size NVMe M.2 SSD. It can also be used to host the Wifi and Bluetooth module (sold separately).
Installing and Configuring OS: Armbian on Orange Pi 5
There are many operating systems we can use for Orange Pi 5. Navigate your browser to Orange Pi 5 download page, you should see some major Linux distributions such as Debian and Ubuntu, as well as operating systems that are designed specifically for Orange Pi 5 such as Orange Pi OS (Arch-based Linux) and Android-based Orange Pi OS (Droid). Current state of those operating systems are still developing. Most of them should run fine, but still lack of optimizations such as hardware acceleration for graphics. But of course they are evolving and getting better and mature every day.
I chose Armbian, a Debian based Linux distro, because previously I already familiar with Ubuntu Desktop. Also, if you look closely at the Armbian Orange Pi 5 page, there’s a way to enable hardware 3D acceleration by installing some packages related to its Mali GPU. Although, it’s already enabled by default in version 23.5 Jammy Gnome. Oh, outside the official download pages provided by Orange Pi, we can also use a fork of Ubuntu ARM64 for Orange Pi 5 compiled by Joshue Riek that also enables hardware acceleration. Using Ubuntu Desktop for ARM should be more interesting because its UI experience should be similar to Ubuntu Desktop for PC, the one that I use almost regularly aside from Windows. However, for the time being, let’s just say I’d rather choose the official image referenced by Orange Pi website because of its higher probability to sustain longer in the future.
Downloading and Flashing Armbian Image
My plan is to use Armbian Jammy Gnome (with desktop) when booting from the SD card. But when I boot from the NVMe SSD, I’ll use Armbian Jammy (console only, no desktop). This is intended because I’ll use my Orange Pi as a Home Server that requires no desktop. I will connect to my Orange Pi via SSH from my laptop and doing everything from there. The desktop version that I installed on the SD card is to make it easier when testing the hardware acceleration features, and also to make it easier to flash the NVMe SSD. Orange Pi 5 prioritizes booting from SD Card. We will configure it later to boot from NVMe SSD when SD card is not installed.
As the first step, download the Armbian Jammy Gnome image from Armbian Orange Pi 5 website, and then flash it to an SD card using Balena Etcher or Rufus (on Windows). The following picture shows the armbian Orange Pi 5 download page at the time of writing this post.

The following picture shows I was using Rufus to flash the Armbian desktop image to an SD Card. When done, insert the SD Card to its slot in Orange Pi 5. If everything done properly, it should boot up.

Booting Armbian Orange Pi 5 on an SD Card
First time booting Armbian desktop, we’ll be asked to supply root password. Also, we’ll be requested to create a username, region, locale, and time zone. If connected to internet while installing, it can detect time zone automatically and determine region and locale. Once passing these steps we’ll be logged in to Armbian desktop. On my Orange Pi 5, it looks like the following picture.

We should run apt update and upgrade to make sure that all packages are latest and then upgrading them to the latest version.
sudo apt update && sudo apt upgradeThe Armbian should run fine at this point, and it should already applied the hardware acceleration for graphics intensive tasks such as rendering 4K videos or playing games. To verify this, open Chromium browser, and type the following text in the address bar.
chrome://gpuWe should see something like this on the Chromium browser.

Flashing and Booting Armbian Orange Pi 5 on a NVMe SSD
Flashing Armbian image for Orange Pi 5 to a NVMe SSD should be easily done inside currently running Armbian desktop itself. If we have LAN that can access internet, it is better to connect the Orange Pi to the LAN and download the image directly from Armbian website. Otherwise we can use a flash drive to copy the image from other computer that has access to the internet. Once downloaded, we can flash the image using dd command after you extract it. I prefer right clicking on the downloaded image file, and choose “Open With Disk Image Writer”.

Once loaded into Disk Image Writer, choose the target device to flash and then start restoring. In my case, I use a Team Group 256 GB NVMe SSD on /dev/nvme0n1.

Next, we should configure the boot loader on eMMC of the Orange Pi. Orange Pi comes with 16 MB built-in eMMC. This is necessary to be able to boot from the NVMe SSD. First, we have to wipe out all previous content from the eMMC by typing the following command. It might take several minutes, so be patient.
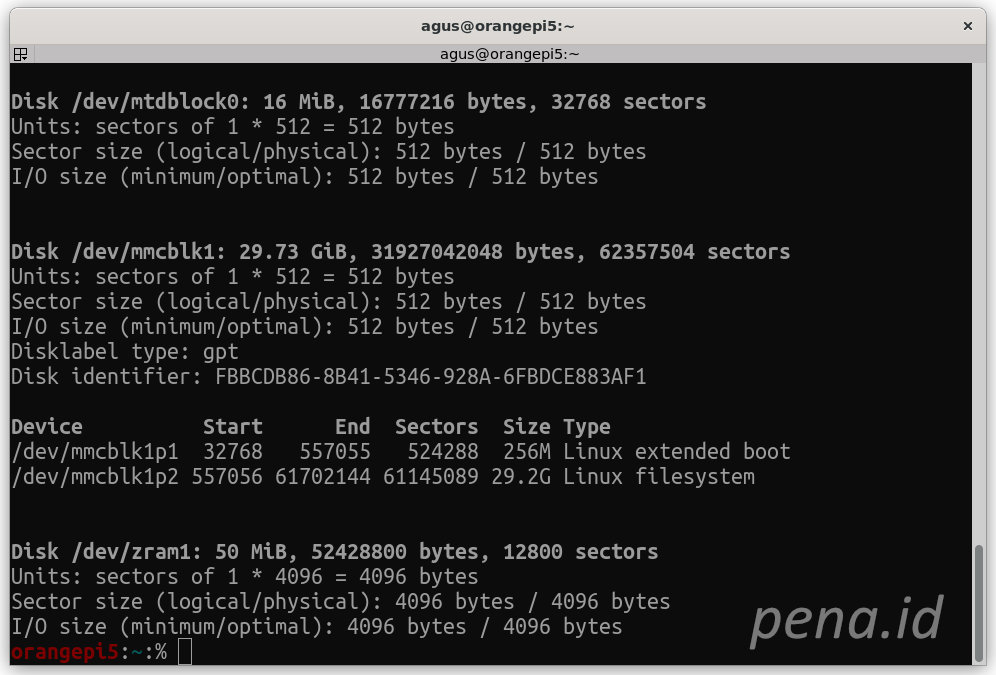
sudo dd if=/dev/zero of=/dev/mtdblock0 bs=16MB count=1Verify the result by typing the following command in the Terminal window.
fdisk -lWe should see that the /dev/mtdblock0 is listed with no partition.
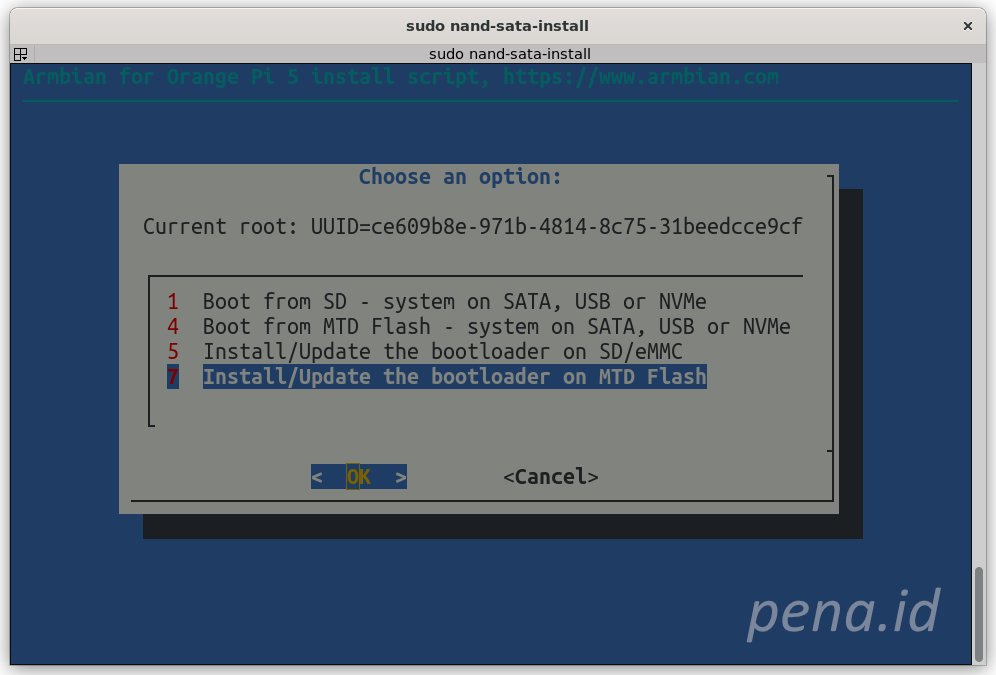
Next, we are ready to configure the boot leader on the eMMC card. To do this, type the following command in the Terminal window.
sudo nand-sata-installThen choose number 7 Install/Update the bootloader on MTD Flash. A warning message should be displayed. Click Yes to continue. Please be patient, this process can take several minutes. Note: in case the nand-sata-install command is not available, you can use armbian-config command, then choose System, then Install. You should see the same screen.
When done, shutdown the Orange PI, pull the SD card from its slot, and then turn back on the Orange Pi. If everything is OK, the Orange Pi should boot from the NVMe SSD. Now, we start configuring the Armbian from the start again, only now we don’t have Gnome desktop, only the shell. From this point, you can continue working directly on the Orange Pi hardware, or setup SSH service so that you can use SSH client on your laptop to work on the Orange Pi as a server.
But, before we can use SSH for remote connection, we have to configure the IP address to static, because by default it is set to DHCP. To do this, use the following command from a console window.
armbian-configA menu will be displayed. Navigate the menu and choose Network. On the second menu, choose the IP. On the IP address assignment window, choose Static. Now we should reach the Status IP Configuration window to change the IP address. Once done, we should be able to perform remote SSH using Putty.

Installing & Configuring Docker Engine on Orange Pi 5
Installing & configuring Docker Engine on Orange Pi 5 is easy. We just follow the installation guide from Docker documentation, using the convenient script.
curl -fsSL https://get.docker.com -o get-docker.sh
sudo sh get-docker.sh
To manage Docker as a non-root user so that we don’t have to prefix docker command with sudo, use the following command, then reboot.
sudo groupadd docker
sudo usermod -aG docker $USER
Test the Docker engine is working using the following command.
docker run hello-worldYou should see something similar to this picture.

Installing Portainer
Portainer is a web interface to manage our Docker containers installed on a Docker engine. It makes us easier to monitor Docker container status and also doing administrative tasks such as restarting a container or login to a container’s console to view log files.
We’ll use a Docker Compose file to install Portainer. We also use VS Code and install Remote – SSH extension in order to edit Docker Compose files on the server. Create a subdirectory under user’s home directory, name it docker. Then, open it from VS Code.

Create portainer subdirectory under docker directory, then create docker-compose.yml file. Below is the content of the yml file for Portainer.
version: "3"
services:
  portainer:
    container_name: portainer
    image: portainer/portainer-ce:latest
    ports:
      - 9443:9443
    volumes:
      - ./data:/data
      - /var/run/docker.sock:/var/run/docker.sock
    restart: unless-stopped
Then perform Docker Compose Up command from inside VS Code context menu, or VS Code’s Terminal window. When done, open a browser and navigate to https://[your_ip_address]:9443 to access the Portainer website.
Conclusion
In this post, I’ve prepared my Orange Pi 5 to be used for a Home Server. Starting from installing Armbian Jammy Gnome into the SD card, configuring hardware acceleration for graphics, configuring boot from an NVMe SSD, installing Docker Engine, and installing Portainer as the first docker container running on the Docker Engine. We will be adding a lot more Docker containers on top of it. Stay tuned.
References

An IT project manager who also passionate in smart home ecosystem. I live in Jakarta, Indonesia. I have a bachelor degree (S.T.) from Teknik Informatika Institut Teknologi Bandung (ITB) class of 1994, and a master degree (M.T.I.) from Magister Teknologi Informasi Universitas Indonesia (UI) class of 2018. I also have a Project Management Professional (PMP®) certificate from Project Management Institute, and a Microsoft Certified Trainer (MCT®) from Microsoft.
- Preparing a RHEL VM for a Home Lab Cloudera Cluster August 27, 2023
- Configuring Jellyfin Media Server August 22, 2023
- Configuring Frigate NVR: An Open Source IP Camera Recording with Object Detection Solution August 16, 2023
- Creating a Secure Tunnel for Home Assistant August 12, 2023
- Installing and Configuring Home Assistant Stack on Docker Ubuntu Server 22.04 August 9, 2023